Tuesday, 19 November 2013

repairing the bread oven and creating a patio

The large bread oven on the back of the gite has partially collapsed and is letting water into the structure of the building. The plan is to partially dismantle the collapsed sections at the top and create a patio on the base with a concrete roof/floor. This will seal in the oven and solve the damp problems and give the guests their own private area for barbeques etc.

The bread oven viewed from the back of the gite:


After many hours of dismantling stone by stone and brick by brick:
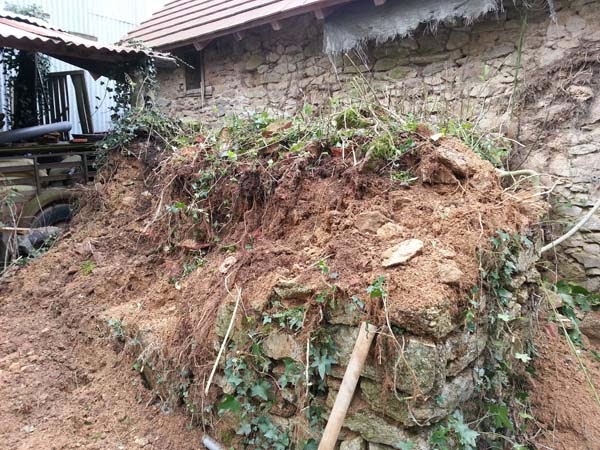

Many tons of earth as well as granite and bricks were removed and now you can see the inside of the oven:


The stone pile getting bigger:


Unfortunately the wall above the oven collapsed as it was supported by the stones we were removing(just missed my foot luckily :) You can now see the Granite lintel of the fireplace inside the main room from the outside! Bit of an oh sh*t moment but we just got on with the task of rebuilding the wall.


The wall rebuilt:


Stones almost removed down to the level of the roof of the bottom oven which will form the floor of the patio:
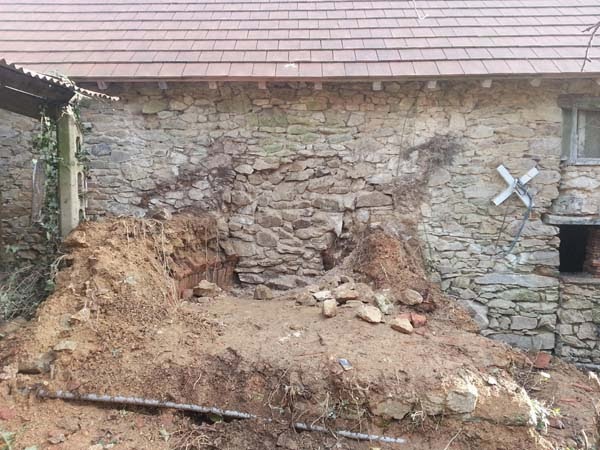

Next was to construct a shuttering from planks and screw it to the wall so it doesn't move under the weight of the concrete and use a damp proof membrane to keep the building dry..


We engineered a slight slope into the patio to make sure the water drains away from the wall. The concrete was mixed inside the cottage as we couldnt get the ballast and mixer out the back easily. Each mix was handed out of a window opening in the building and poured a bucket at a time.


Reinforcing steel was used to prevent cracking and we also added galvanised fence posts into the mixture so we can add a privacy fence later.


A tent was created from tarps in case it rained overnight. Much to my displeasure a cat walked over the new concrete before it dried :'(


Removing the 2nd floor

The second floor in both rooms needs to come out so all the Oak beams/ joists are to be removed. I bought an electric chainsaw for this purpose as it is more pleasant to use indoors than a 2 stroke saw and just as powerful- it goes through the beams like a hot knife through butter.

We fitted 2 Acro props to each beam and I carefully checked them for nails before cutting so as not to blunt the new saw.


Getting there:

And in the smaller room as well:


We also need to block in the openings for the original fireplace so we mixed up some mortar and tried to match the original stone work with the stones we had available...

Top opening blocked in:

Bottom opening half done:

You can see inside the original bread oven here through the bottom opening. The oven has partially collapsed at the back of the cottage so water drips through when it rains and enters the building via the fireplace that is being blocked in here. The Bread oven repairs are coming soon.


More stonework to block in holes next to the fireplace beam :


Working on the gite

The upper floor in the large room cleared of junk and all floor boards removed:


The doorway between the 2 room has not been supported properly with a decent lintel so it needs to be removed.

After removing the wood at a safe distance the stone work fell away in an arch:

At some point the wall will be rebuilt with a higher doorway and a proper lintel.


Ridelimousin Gite conversion

We have a derelict outbuilding which we have started to convert into a small 1 bedroomed holiday gite. Here is what it looked like before we started work, it already has a new roof with V-lux windows however apart from this it is just a shell. No water, no services, just the walls and the new roof so it will be an interesting project with no outside help.


Currently just used as a wood store...


Thursday, 12 September 2013

Tree felling

Have now got a video on YouTube of the farmer that helped get the chainsaw out of the tree that got stuck when cutting it down. 

As the tree was hollow I was unable to cut a notch in it and when I had cut all the way round the tree didn't budge, and the saw got stuck between the top and bottom of the tree. 

Luckily the farmer saw what was happening and volunteered to stand under the tree and rescue the saw whilst I pulled it down with my car! 


Thursday, 5 September 2013

New games room!

After finishing the work on the main house we had time to convert one of the 50 square metre vaulted cellars into a new games room. The first job was to clear it out and level the floor. The cellar started out with a damp soil floor and the walls were all bare granite and also very damp. The plan was to render the walls with a breathable lime and sand render and make a concrete floor with a damp proof membrane. The cellar at the beginning of the job:

The lime render was mixed in the cement mixer, then transfered into buckets and applied to the walls using a sponge. A very time consuming process (several days) as there are a lot of walls and they have deep gaps betweem them that need filling also.
The finished walls, turned out quite well and a lot less damp and dingy now.

Next a really big job is to level the floor, we now have a laser tripod level which makes this a much easier task. we shifted the soil around the cellar until it was roughly the same height everywhere.
Then we laid the damp proof membrane.


Next we place metal work around the floor and cement it in at the same level all round to give the final floor height and allow it to be leveled off later. We also used reinforcing mesh to stop the concrete cracking.
I made up a chute to pour the concrete down from boards and lined it with damp proof membrane to allow the wet concrete to slide down it. This way we can have the mixer outside next to the piles of sand, gravel and sacks of cement and when mixed I can flip the mixer down the chute. Ro has a wheelbarrow at the bottom of the chute and can then place the concrete where its needed.

As the floor is so large we laid it in sections and worked on it when we had time over several weeks. We used about 3 cubic metres of concrete in total with my trailer only taking a ton of material at a time that was a lot of journies to the DIY shop to get sand, gravel and cement!

The final floor, doesn't look bad for a first attempt!


My next job was to wire in lights, sockets and bring a tv cable down from the house. Luckily I was able to pull a cable down from the kitchen ceiling, through the conduit for the wiring circuits in the cellar and then extend it along the walls via my new wiring to the sockets.


>


The new games room is large enough for a full sized table tennis table, a pool table, several sofas, table and chairs and still loads of space. Cost us about a 1000 euros in materials, so not bad for gaining such a decent room!